If chip carving has ever been something you've wanted to do, you know how difficult it can be. There are many styles and techniques you can use, but which one is the best? What tools do I need? In this article, I'll share my tips and tricks for carving chips, and help you decide which one is right for you. You can carve potato chips in a traditional or more modern way, but there are some essentials that will help you succeed.
Traditional
Chip carving can be considered one of the oldest forms in decorative woodcarving. It requires a straight-edged knife but a skew-ground or offset blade knife can also be used. Chip carving involves making small triangular cuts in wood to create patterns. This art form evolved in different countries simultaneously over 1,000 year ago. Due to their widespread popularity, the designs were often very similar across nationalities making it hard to differentiate one from another.
The skills needed to carve wood became more popular as the practice spread around the globe. Chip carving is a popular method of decorating furniture in Sweden. In fact, there were even schools that taught the art. Modern chip carvers can benefit from centuries-old chip carvers' skills and knowledge. Through the generations, knowledge was passed from carver to apprentice to student. It's a continuous process that continues into the present.
Free form
If you've always wanted to try chip carving, you've come to the right place. Murray Taylor's DVD shows you how to make freeform and geometric carvings. It is an excellent introductory project with plenty of information. English and NTSC formats are also available. The DVD is also available in stereo and widescreen formats. The owner of the DVD is Artisan Media Ltd., and it is available in MP4 format for Windows and Mac computers.
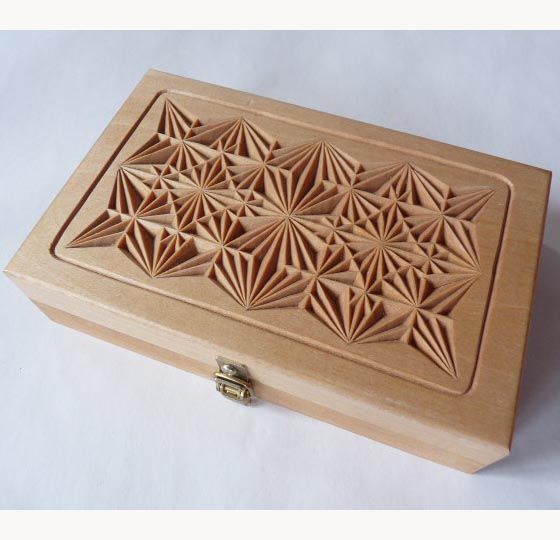
Geometric chip carving is based on lines, circles, triangles and circles. This technique can be combined with different styles and shapes to create endless possibilities. This technique is also known by the free-form style of chip carving. Your chips can be any shape you like, from a flower to a dragon. A free-form method of chip carving is a great way to incorporate several different techniques into one piece.
Techniques
Chip carving has been around since the beginning of time. Many countries have examples of chip carving. Chip carvings have been discovered on paddles and handles for ceremonial tools in the South Pacific Islands. These carvings were probably done using bits and pieces of bone, seashells, or shark teeth. This book will show you how to create amazing designs by using different chip carving techniques.
If you are able to follow some simple steps, chip carving can be easy. The first step is to learn how you can carve the fine triangle. This pattern is very easy to comprehend and execute. This pattern is easy to carve. You simply need to cut various triangles, and then repeat the process. However, chip carving doesn't have be boring. Variation of the triangles can give you a wide variety of patterns.
Tools
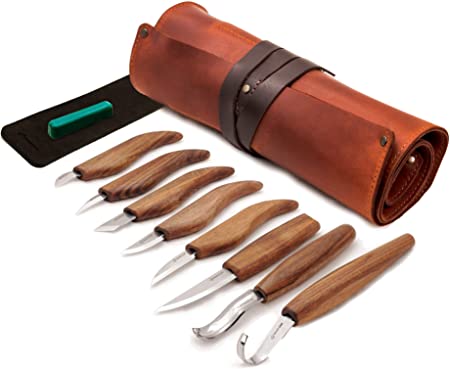
Lora S. Irish's free online seminar will show you how to chip carve basic steps. She will teach you how use different carving tools and supplies such as a chip and stab knives, detail bench knife, and detail table knife. Irish will also be demonstrating the different types and uses of wood carving tools. The list below will help you choose the right tool to suit your carving needs. These tools can be used to create simple designs and shapes, or more complex designs.
Special geometry is used to create a chip carving knife. It measures approximately one-half inches in length and has a narrow, curved edge at the back. This allows for precise incisions. To ensure perfect edges, it is crucial to choose a sharp, pointed point. Also made of stainless steel, chip carving knives come with a sharp point. A chip carving knife should not be too sharp to cut a single piece of wood.
Getting started
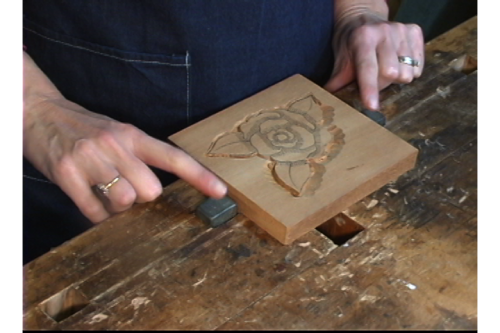
First, learn about chip carving. This process varies based on the type of carving that you intend to do. Nevertheless, you should be aware of some basic principles to ensure that your work is as accurate as possible. Chip carving is a technique that involves creating a fine pattern in wood. To create your first chip carving, follow these steps:
It is important to properly sharpen a chip carving knife. The blade of the chip carving knife will have bevels on each side, indicating that it is a primary chip carving knife. The sharpening stones are shaped like diamonds and can create efficient edges. Place the stone at a 10 degree angle. The stone will both sharpen and shave the chip carving knives and tool simultaneously.
FAQ
Is there anything else I should know about woodworking?
Furniture making is a laborious task. It's easy not to appreciate how hard it is. Finding the right kind of wood is the most difficult part. There are so many wood options that it can be difficult to choose the right one.
The problem with wood is that not all wood properties are the same. Some woods will warp over time, others will split or crack. These things should be considered before you buy wood.
How much money does a hobbyist have to put into getting started?
To start your own woodworking company, you will likely need capital to purchase the necessary tools and other supplies. It's a good idea to buy a small tablesaw, drill press and circular saw. These items won't break the budget and aren't expensive.
How often should new supplies be purchased?
Some tools will need to be replaced over time. Sharpening hand tools is a must. For power tools, replacement parts will be required frequently. To avoid buying too much at once, try to spread your purchases out over a few months.
Are you looking for tips to start a woodworking company?
It takes a lot of effort to start a woodworking business. You won't mind working hard if your hobby is something you love. You will probably love the challenge of starting your own business.
Remember that you may encounter unexpected problems when starting a new venture. You might run out money, or you may have to borrow unexpectedly. You might find customers not willing to pay the amount you expected. These situations are necessary for survival.
It is a good idea to create a separate bank account just for your company. You'll know exactly how much money is coming in by setting up a separate bank account.
What types of woods are best for furniture making?
Woods are classified by their hardness. Softwoods include cedar, pine, cedar, and Cypress. Because they are resistant, they can be used for outdoor furniture. These hardwoods include maple, mahogany and teak. Because they can't weather outside, they're usually used indoors.
Statistics
- Overall employment of woodworkers is projected to grow 8 percent from 2020 to 2030, about as fast as the average for all occupations. (bls.gov)
- Woodworkers on the lower end of that spectrum, the bottom 10% to be exact, make roughly $24,000 a year, while the top 10% makes $108,000. (zippia.com)
- Most woodworkers agree that lumber moisture needs to be under 10% for building furniture. (woodandshop.com)
- The best-paid 10 percent make $76,000, while the lowest-paid 10 percent make $34,000. (zippia.com)
External Links
How To
Tips for driving a nail in wood
When driving a nail into wood, it is important to first choose the correct size and kind of hammer. The most commonly used types of Hammers are claw hammers. Each kind of hammer has its own advantages and disadvantages. A claw hammer works well when you're trying to hit nails with a heavy hammer. However it is difficult to precisely control where the blow hits. The sledgehammer works well for large areas, but is too heavy for smaller tasks.
After selecting the right hammer, you will need to place your hand flat against one side of the head. The handle should rest comfortably in your hands. You can grip the handle with your fingers, but not so tight that it causes injury. Keep your wrist relaxed and the hammer straight up. Swing the hammer back towards the ground, with your aim at the middle of the nail. The impact of the hammer hitting the nail should be felt. If you're having trouble getting the hang of swinging a hammer, practice with a block of wood until you get the rhythm down.
You can now drive the nail by holding the hammer to your body. Place the nail so that it is perpendicular with the wood's surface. Keep your attention on the tip. Swing the hammer forward, then follow through with the motion of the hammerhead. Continue this motion several times, slowly increasing the speed of each swing. Once you've mastered the technique, try adding power to your swings. Try holding the hammer above your shoulder and bring it down forcefully. This will help you put more energy behind each of your moves.
Once you have successfully drilled the first hole in the nail, remove the hammer. Use a pry bar or screwdriver to pull out the rest of the nails. Keep the nails heads in line with the surface of the board to prevent splitting the wood.